Routenplaner für die nächste Woche
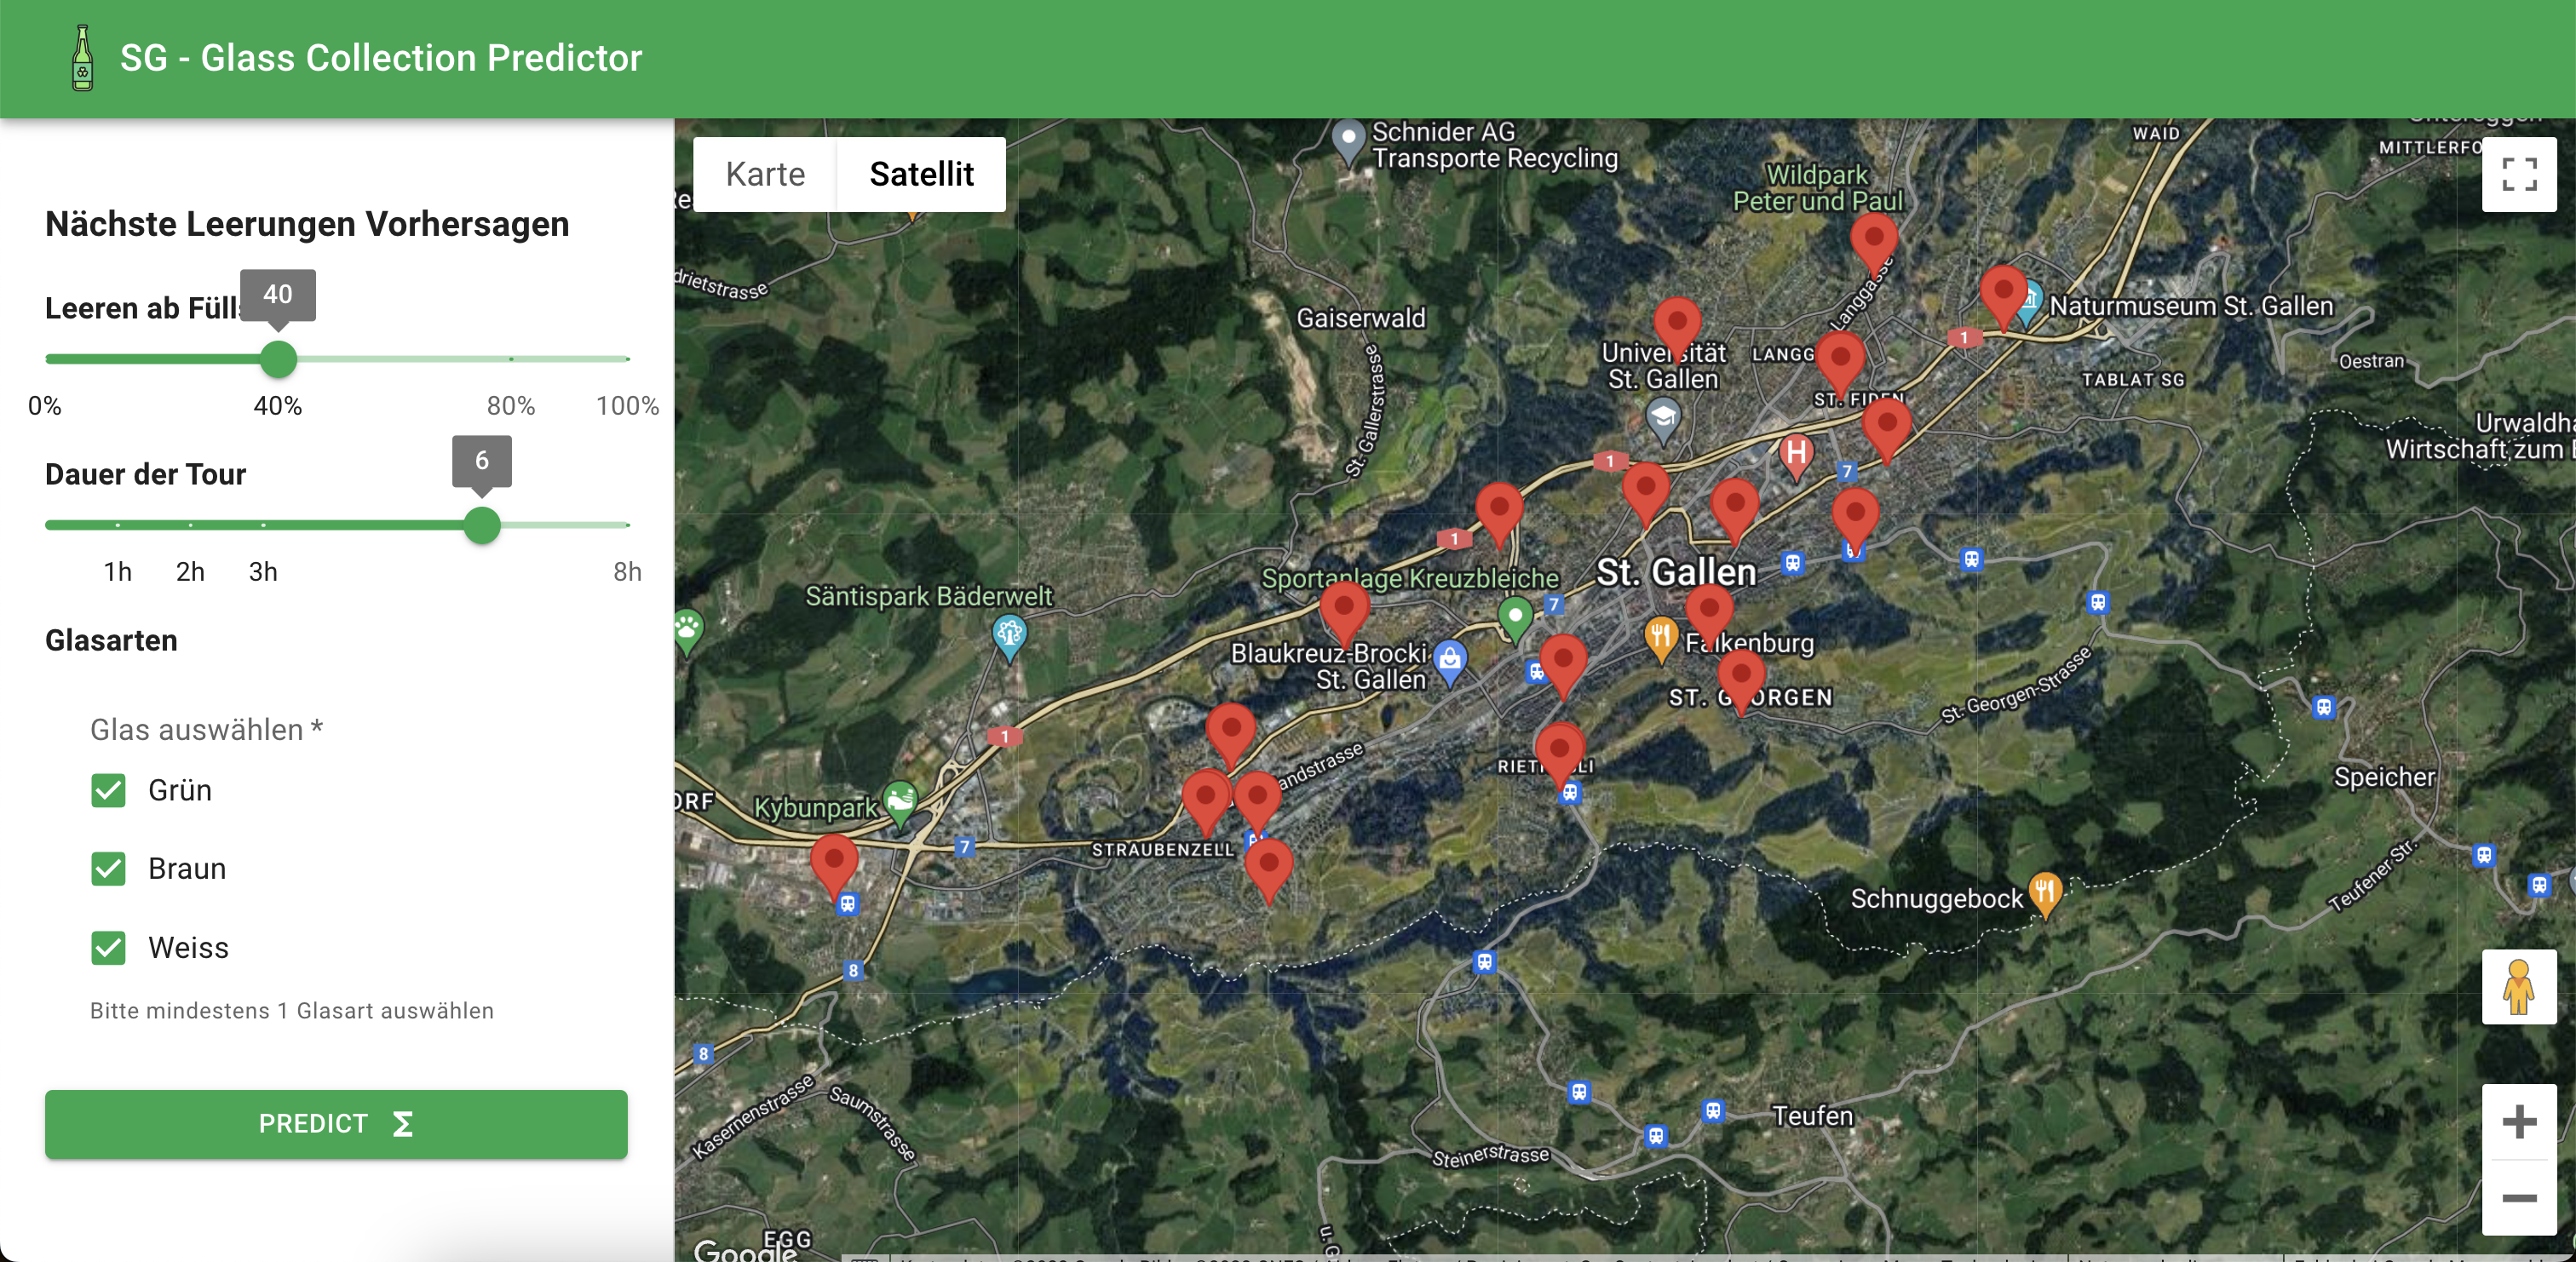
Wir nutzten ein Long short-term memory neuronales Netztwerk um alle Routen der nächsten Woche in Google Maps zu planen
Für den Google Drive Link muss man den Link eventuell in einem separaten Fenster öffnen.
Open Data Hack 2023
Initial Goal 🎯
Use an LSTM AI model to predict the fill levels of recycling stations in St. Gallen and create a pathfinding algorithm that finds the ideal routes for city employees, for the next work week.
Components 🧩
- AI model that predicts future fill levels based on historic data
- Pathfinding algorithm that finds the optimal order of recycling stations based on the predicted fill levels and location
- Visualization of the optimal route via a web app
Our Result 🤗
This is how our application can be used:
- The user enters the web app via the browser and sees the location of all glass containers that are equipped with sensors.

- On the left side the user can set values that steer the calculation of the path finding algorithm and the prediction:
Leeren ab Füllstand: Threshold that defines the level (in percentage) of the containers that should be emptied. Containers with a lower level of glass contained are being ignore by the path finding algorithm.Dauer der Tour: Number of working hours that the resulting path should occupy (0-8).Glasarten: Which types of glass (white, brown, green) should be considered in the resulting path.
- After clicking
Predict, the path finding algorithm is called via a REST API that works in the background: a) The (driving) distances between the containers are calculated in a preliminary step upon startup of the REST API using Google Maps API. The distances are then saved in a file and loaded whenever needed. b) The costs are being calculated as a mixture of a greedy algorithm and a nearest neighbor algorithm. The distances between containers (nearest neighbor) are weighted by the level they are filled (greedy). c) The algorithm then starts at station0 which is fixed at the "Kehrrichtheizkraftwerk St. Gallen" and then takes on the path that has the smallest cost. d) When the most containers of a path are found, we implemented a refining step. In this step we aim to minimize the driving time by reorganizing the order of the containers in the path. - The calculated path is being displayed to the user with all the necessary infos.
- A selection for a date in the next 5 days to show the route for
- Query information of the beforehand input
- The locations of the tour with the expected fill level of each container

- Location of the container
- Fill Level of of the container
- Glass type of the container

- The overall route of the path

Details
Prediction for 5 days into the future
The model is trained in sequences of 5 days to predict the 6. day. Therefore, the last 5 days of data are being considered in order to calculate the predicted value for tomorrow. In order to calculate the predictions for the day after tomorrow, the previous preidiction of tomorrow is being used in a feedback loop.
#### Path Refinement As from our rough tests, the path refinement results in a reduced driving time of approximately 5-10 minutes per path.
Path Constraint
In order to make it as realistic as possible, we have defined two constraints for the path:
- The path should be calculated such that it fits into 1 working day (8h, adjustable via UI)
- The fillment level of a trough should not be exceeded (currently set to 10 containers = 1 fillment of a trough, also it is not yet distinguished between volume per glass type)
We then start at station0 (Heizkraftwerk St. Gallen) and we continuously add containers until eiher the time is excceeded (inclusive time to get back to station0) or the trough is full. The needed time is calculated by summing up the driving times and the time per emptying (fixed at 15 Minutes per container - some extra time included for gradual delays) per container.
Currently, we don't consider emptying nearby containers of other glass types which are below the set threshold but in reality, this would be a reasonable extension to the application.
Future Ideas ✨
Ideas that can be explored if there is time:
- [ ] Host on a server
- [ ] Improve the model by adding more influencing parameters such as weekday, season or fill levels of nearby ALU sensors
- [ ] Edge case handling
- [ ] Torough testing
- [ ] Vary the number of inputs, the timeranges, the number of outputs...
- [ ] Add sensor noise threshold
- [ ] Test if training on single sensors is better
Setup
Create a conda environment with conda create --name <env> --file requirements.txt. We recommend using python version 3.9.
Create a Google Maps API key and save it for later steps (you can easily find the documentation online).
Run the bash script download-data.sh. This will download the data to the data folder. Afterwards run preprocessing.py directly which will create a single csv file from all the 3 datasets.
##### Alternative Setup: Download the files below into the data folder:
- Füllstandsensoren Glassammelstellen (Weissglas)
- Füllstandsensoren Glassammelstellen (Grünglas)
- Füllstandsensoren Glassammelstellen (Braunglas)
Train the model
To train the model, the datasets must be available and merged (as done in the Setup step). The file must be available under data/days_merged.csv. Afterwards, you can execute main.py in the project root which will train the model and save a snapshot to the trained-models/ folder.
API
The Google Maps API key must be saved under as MAPS_KEY=<key> in a .env file in the project root.
In order to use the model, the datasets must be available and merged (as done in the Setup step). Also, the model must be trained. Afterwards, the command flask --app lib/api run can be executed from the project root.
UI
The Google Maps API key must be saved in a second location as REACT_APP_GOOGLE_MAPS_API_KEY=<key> in a .env file in the predictor-app/ folder.
The UI is located in the predictor-app/ folder. First run npm install in the given folder, the start it using npm run start.
Previous
Open Data Hack St.Gallen
Next project


